(Quick Reference)
Spring Security REST Plugin - Reference Documentation
Authors: Alvaro Sanchez-Mariscal
Version: 1.5.0.RC3
1 Introduction to the Spring Security REST plugin
The Spring Security REST Grails plugin allows you to use Spring Security for a stateless, token-based, RESTful authentication.
This plugin depends on Spring Security Core 2.x.
Make sure your application is compatible with that version first. There is a
feature request, that may be addressed in the
future if there is enough community interest / love :)
This plugin is only for Grails 2.x
The default behaviour of Spring Security is to store the authenticated principal in the HTTP session. However, in a
RESTful scenario, we need to make sure our server is stateless.
The typical flow could be the following:
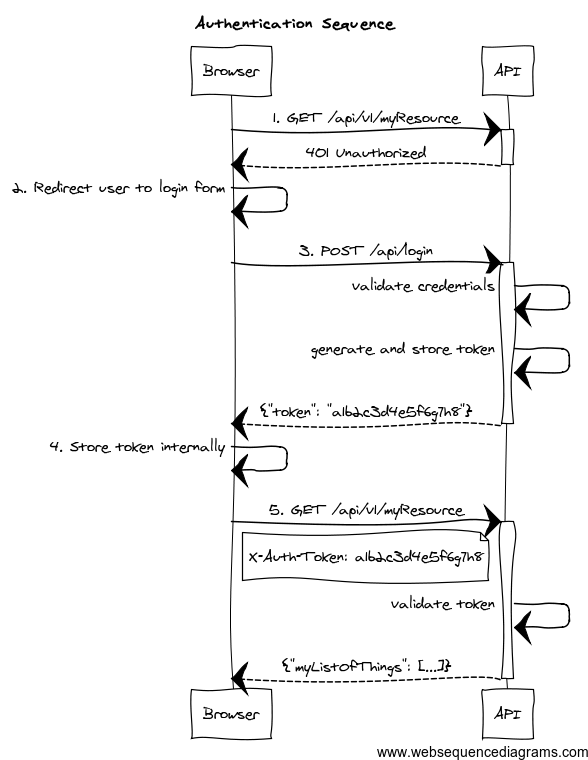
- The client application requests and endpoint that requires authentication, so the server responds with a 401 response.
- The client redirects the user to the login form.
- The user enter credentials, and the client sends a request to the authentication endpoint. The server validates credentials, and if valid, generates, stores and sends back a token to the client.
- The client then stores the token internally. It will be sent on every API method request.
- The client sends again a request to the protected resource, passing the token as an HTTP header.
- The server validates the token, and if valid, executes the actual operation requested.
As per the
REST definition, the client is transferring its
state on every request so the server is truly stateless.
This plugin helps you to wire your existing Spring Security
authentication mechanism, provides you
with ready-to-use
token generation strategies and comes prepackaged with JWT, Memcached, GORM, Redis
and Grails Cache support for
token storage.
Release History
You can view all releases at https://github.com/alvarosanchez/grails-spring-security-rest/releases.
- 13 April 2015
- 9 April 2015
- 2 April 2015
- 1 April 2015
- 24 February 2015
- 3 February 2015
- 28 January 2015
- 12 November 2014
- 20 October 2014
- 12 August 2014
- 14 July 2014
- 4 July 2014
- 24 June 2014
- 24 June 2014
- 20 June 2014
- 11 June 2014
- 1 June 2014
- 29 May 2014
- 23 April 2014
- 16 April 2014
- 3 April 2014
- 18 March 2014
- 4 March 2014
- 17 February 2014
- 10 February 2014
- 4 February 2014
- 31 January 2014
- 15 January 2014
- 14 January 2014
- 13 January 2014
- 12 January 2014
- 10 January 2014
- 31 December 2013
- Initial 1.0.0.RC1 release.
2 What's new in 1.5?
JWT support
JWT is fully supported and is now the default token "storage" mechanism. If you still want to use your previous storage
(such as Memcached or GORM), make sure you explicitly set to
true one of the following properties:
| Config key | Default value |
|---|
grails.plugin.springsecurity.rest.token.storage.useMemcached | false |
grails.plugin.springsecurity.rest.token.storage.useGorm | false |
grails.plugin.springsecurity.rest.token.storage.useGrailsCache | false |
If switching over JWT, the
logout behavior is not available anymore. Read the documentation on how to
implement your own logout strategy if you want to.
Redis support
Redis can now be used as
token storage service. Thanks to
Philipp Eschenbach for
his initial contribution.
New package base
Packages
com.odobo.grails.plugin.springsecurity.rest. have been refactored to simply
grails.plugin.springsecurity.rest..
Make sure to double-check your imports when upgrading to 1.5.
Other minor changes
- The plugin now uses Grails 2.4.4, and the build and tests are executed with Java 8.
- Documentation for older versions is now published at
3 What's new in 1.4?
Full compatibility with Spring Security core.
Up to previous releases, this plugin was overriding "stateful" Spring Security core beans, to ensure a stateless behaviour.
After some users reported issues integrating this plugin with existing installations, version 1.4 now follows a more
friendly approach.
A
new chapter has been created explaining how to configure the filter chains appropriately.
RFC 6750 Bearer Token support by default
Now, the token validation and rendering aligns with the
RFC 6750 Bearer Token spec.
If you want to keep the old behaviour, simply disable it by setting
grails.plugin.springsecurity.rest.token.validation.useBearerToken = falseCredentials are extracted from JSON by default
It makes more sense in a REST application. The old behaviour can still be used by using the corresponding configuration
property.
Anonymous access is allowed
In case you want to enable anonymous access (read: not authenticated) to certain URL patterns, you can do so. Take a
look at the
new chapter in the documentation.
Other minor changes
- Upgraded dependencies:
spring-security-core:2.0-RC3.cors:1.1.6.
4 Configuration
Once the plugin is installed, you are ready to go. The default configuration is to use signed
JWT's for tokens. However, you can select any other
token storage strategy:
- Grails Cache.
- Memcached
- GORM.
- Redis
- Provide your own: implement TokenStorageService and register it in
resources.groovy as tokenStorageService
Plugin configuration
This plugin depends on Spring Security Core 2.x.
Make sure your application is compatible with that version first.
This plugin is compatible by default with Spring Security core traditional, form-based authentication. The important thing
to remember is: you have to separate the filter chains, so different filters are applied on each case.
The stateless, token-based approach of this plugin is incompatible with the HTTP session-based approach of Spring Security,
core, so the trick is to identify what URL patterns have to be stateless, and what others have to be stateful (if any).
To configure the chains properly, you can use the
grails.plugin.springsecurity.filterChain.chainMap property:
grails.plugin.springsecurity.filterChain.chainMap = [
    '/api/**': 'JOINED_FILTERS,-exceptionTranslationFilter,-authenticationProcessingFilter,-securityContextPersistenceFilter,-rememberMeAuthenticationFilter',  // Stateless chain
    '/**': 'JOINED_FILTERS,-restTokenValidationFilter,-restExceptionTranslationFilter'                                                                          // Traditional chain
]
To understand this syntax, please read the
Spring Security Core documentation.
Long story short:
JOINED_FILTERS refers to all the configured filters. The minus (
-) notation means all the previous values
but the neglected one.
So the first chain applies all the filters except the stateful ones. The second one applies all the filters but the stateless ones.
Make sure that the stateless chain applies not only to your REST controllers, but also to the URL's where this plugin
filters are listening: by default, /api/login for authentication, /api/logout for
logout and /api/validate for token validation.
The difference is that, in a traditional form-based authentication, Spring Security will respond with an HTTP 302 redirect
to the login controller. That doesn't work for an API, so in the stateless approach, an HTTP 401 response will be sent back.
5 Authentication Endpoint
The
authentication filter
uses the default
authenticationManager bean, which in turn uses all the registered authentication
providers. See the
Spring Security Core guide
for more information about how to define your own providers. Note that you can easily plug any Spring Security sub-plugin
(like the LDAP one) to use a different authentication strategy.
If the authentication is successful, a
token generator is used to generate a token, and a
token storage implementation is used to store the token. Finally, the JSON response sent back to the
client is rendered by a
restAuthenticationTokenJsonRenderer bean. See the
token rendering documentation
for more details.
This authentication filter will only be applied to the above configured URL and can also be disabled, in case a different approach
for token creation is followed. In the rest of the cases, the request will continue through the filter chain, reaching Spring Security
Core filters. Bear in mind that, by default, Spring Security Core 2.x locks down all URL's unless a explicit securiy rule has been
specified for each of them.See Spring Security Core documentation
for more information.
The following are the
Config.groovy properties available:
| Config key | Default value |
|---|
grails.plugin.springsecurity.rest.login.active | true |
grails.plugin.springsecurity.rest.login.endpointUrl | /api/login |
grails.plugin.springsecurity.rest.login.failureStatusCode | 401 |
Extracting credentials from the request
The plugin supports 2 ways of extracting the username and password: using request parameters, and using a JSON payload.
To align with the RESTful principles, JSON payload is the default behaviour.
From a JSON request
| Config key | Default value |
|---|
grails.plugin.springsecurity.rest.login.useJsonCredentials | true |
grails.plugin.springsecurity.rest.login.usernamePropertyName | username |
grails.plugin.springsecurity.rest.login.passwordPropertyName | password |
The default implementation expects a request like this:
{
    "username": "john.doe",
    "password": "dontTellAnybody"
}
If you use
usernamePropertyName and
passwordPropertyName properties mentioned above, your JSON request can look like:
{
    "login": "john.doe",
    "pwd": "dontTellAnybody"
}
With the following config:
grails.plugin.springsecurity.rest.login.usernamePropertyName = 'login'
grails.plugin.springsecurity.rest.login.passwordPropertyName = 'pwd'
If your JSON request format is different, you can plug your own implementation by defining a class which extends
AbstractJsonPayloadCredentialsExtractor.
The default implementation looks like this:
@Slf4j
class DefaultJsonPayloadCredentialsExtractor extends AbstractJsonPayloadCredentialsExtractor {    String usernamePropertyName
    String passwordPropertyName    UsernamePasswordAuthenticationToken extractCredentials(HttpServletRequest httpServletRequest) {
        def jsonBody = getJsonBody(httpServletRequest)        if (jsonBody) {
            String username = jsonBody."${usernamePropertyName}"
            String password = jsonBody."${passwordPropertyName}"            log.debug "Extracted credentials from JSON payload. Username: ${username}, password: ${password?.size()?'[PROTECTED]':'[MISSING]'}"            new UsernamePasswordAuthenticationToken(username, password)
        } else {
            log.debug "No JSON body sent in the request"
            return null
        }
    }}
Once you are done, register it in
resources.groovy with the name
credentialsExtractor.
From request parameters
Note that the name of the parameters can also be customised:
| Config key | Default value |
|---|
grails.plugin.springsecurity.rest.login.useRequestParamsCredentials | false |
grails.plugin.springsecurity.rest.login.usernamePropertyName | username |
grails.plugin.springsecurity.rest.login.passwordPropertyName | password |
5.1 Logout Endpoint
Logout is not possible when using JWT:guide:jwt tokens (the default strategy), as no state is kept in the server. If
you still want to have logout, you can provide your own implementation by creating a subclass of
JwtTokenStorageService
and overriding the methods storeToken and removeToken.Then, register your implementation in resources.groovy as tokenStorageService.However, a more rational approach would be just to remove the token from the client (eg, browser's local storage) and
let the tokens expire (they will expire anyway, unlike with other storages like Memcached or Redis where they get refreshed
on every access).
The
logout filter
exposes an endpoint for deleting tokens. It will read the token from an HTTP header. If found, will delete it from the
storage, sending a 200 response. Otherwise, it will send a 404 response.
You can configure it in
Config.groovy using this properties:
| Config key | Default value |
|---|
grails.plugin.springsecurity.rest.logout.endpointUrl | /api/logout |
grails.plugin.springsecurity.rest.token.validation.headerName | X-Auth-Token |
6 Token Generation
By default, the plugin generates
JWT tokens. Note that when using JWT, you can't plug any other token generator.
If you are not using JWT, but any stateful strategy like Memcached or GORM, the following strategies are available:
The strategy used is configurable in
Config.groovy:
| Config key | Default value |
|---|
grails.plugin.springsecurity.rest.token.generation.useSecureRandom | true |
grails.plugin.springsecurity.rest.token.generation.useUUID | false |
Both of them generate tokens of 32 alphanumeric characters.
That should be enough for most of the human beings. But if you still want to provide your own implementation,
simply write a class implementing
TokenGenerator
and wire it up in
resources.groovy as
tokenGenerator.
7 Token Storage
The tokens are stored on the server using a
tokenStorageService bean. The plugin comes with out-of-the-box support
for JWT, Memcached, GORM and
Grails Cache, but you can use your own strategy implementing the
TokenStorageService
interface.
The default implementation, JWT, is stateless. Nothing is really stored. However, the plugin still gives a
chance to the other implementations to store the principal if they need to.
7.1 JSON Web Token
JSON Web Token (JWT) is an
IETF standard (in progress)
which defines a secure way to encapsulate arbitrary data that can be sent over unsecure URL's.
Generally speaking, JWT's can be useful in the following use cases:
- When generating "one click" action emails, like "delete this comment" or "add this to favorites". Instead of giving the users URL's like
/comment/delete/123, you can give them something like /comment/delete/<JWT_TOKEN>, where the JWT_TOKEN contains encapsulated information about the user and the comment, in a safe way, so authentication is not required.
- To achieve single sign-on, by sharing a JWT across applications.
In the context of authentication and authorization, JWT will help you implement a stateless implementation, as the
principal information is stored directly in the JWT.
How does a JWT looks like?
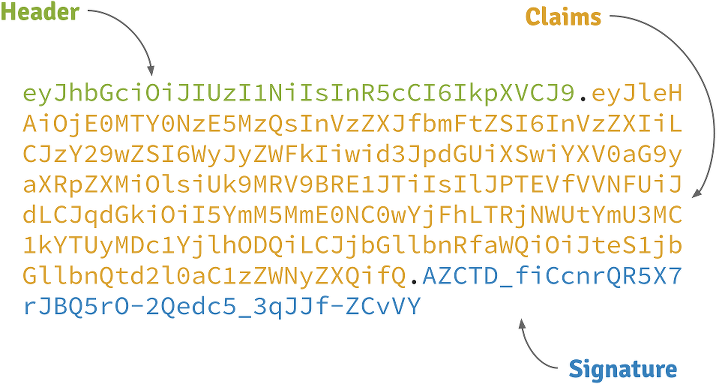
Header
A base64-encoded JSON like:
{
    "alg": "HS256",
    "typ": "JWT"
}
Claims
A base64-encoded JSON like:
{
    "exp": 1422990129,
    "sub": "jimi",
    "roles": [
        "ROLE_ADMIN",
        "ROLE_USER"
    ],
    "iat": 1422986529
}
Signature
Depends on the algorithm specified on the header, it can be a digital signature of the base64-encoded header and claims,
or an encryption of them using RSA.
Signed JWT's
By default, this plugin uses signed JWT's as specified by the
JSON Web Signature specification. More specifically,
the algorithm used is HMAC SHA-256 with a specified shared secret. The relevant configuration properties are:
| Config key | Default value |
|---|
grails.plugin.springsecurity.rest.token.storage.useJwt | true |
grails.plugin.springsecurity.rest.token.storage.jwt.useSignedJwt | true |
grails.plugin.springsecurity.rest.token.storage.jwt.secret | 'qrD6h8K6S9503Q06Y6Rfk21TErImPYqa' |
grails.plugin.springsecurity.rest.token.storage.jwt.expiration | 3600 |
Encrypted JWT's
Grails's grails-docs artifact includes a version of com.lowagie:itext which in turns bring old BouncyCastle's libraries
into the classpath. To avoid the problem, you have to override explicitly that dependency:build("com.lowagie:itext:2.0.8") { excludes "bouncycastle:bcprov-jdk14:138", "org.bouncycastle:bcprov-jdk14:1.38" }
In the previous strategy, the claims are just signed, so it prevents an attacker to tamper its contents to introduce
malicious data or try a privilege escalation by adding more roles. However, the claims can be decoded just by using
Base 64.
If the claims contains sensitive information, you can use a
JSON Web Encryption algorithm to prevent them to be decoded.
Particularly, this plugin uses RSAES OAEP for key encryption and AES GCM (Galois/Counter Mode) algorithm with a 256 bit key
for content encryption.
By default, RSA public/private keys ar generated every time the application runs. This means that generated tokens
won't be decrypted across executions of the application. So better create your own key pair using OpenSSL:
openssl genrsa -out private_key.pem 2048
openssl pkcs8 -topk8 -inform PEM -outform DER -in private_key.pem -out private_key.der -nocrypt
openssl rsa -in private_key.pem -pubout -outform DER -out public_key.der
Then, configure the keys properly, along with the rest of the configuration:
| Config key | Default value |
|---|
grails.plugin.springsecurity.rest.token.storage.useJwt | true |
grails.plugin.springsecurity.rest.token.storage.jwt.useEncryptedJwt | false |
grails.plugin.springsecurity.rest.token.storage.jwt.privateKeyPath | null |
grails.plugin.springsecurity.rest.token.storage.jwt.publicKeyPath | null |
Example configuration:
grails.plugin.springsecurity.rest.token.storage.jwt.useEncryptedJwt = true
grails.plugin.springsecurity.rest.token.storage.jwt.privateKeyPath = '/path/to/private_key.der'
grails.plugin.springsecurity.rest.token.storage.jwt.publicKeyPath = '/path/to/public_key.der'
Token expiration and refresh tokens
When using JWT, issued access tokens expire after a period of time, and they are paired with refresh tokens, eg:
{
   "username": "jimi",
   "roles": [
      "ROLE_ADMIN",
      "ROLE_USER"
   ],
   "expires_in": 3600,
   "token_type": "Bearer",
   "refresh_token": "eyJhbGciOiJSU0EtT0FFUCIsImVuYyI6IkEyNTZHQ00ifQ.fUaSWIdZakFX7CyimRIPhuw0sfevgmwL2xzm5H0TuaqwKx24EafCO0TruGKG-lN-wGCITssnF2LQTqRzQGp0PoLXHfUJ0kkz5rBl6LtnRu7cdD1ZUNYXLJtFjQ3IATzoo15tPafRPyStG1Qm7-1L0VxquhrLxkkpti0F1_VTytZAq8ltFrnxM4ahJUwS7eriivvdLqmHtnwuXw0kBXEseIyCkiyKklWDJAcD_P_gHoQJvSCoXedlr7Pp0n6LEUrRWJ2Hb-Zyt9dWqWDxm9nyDeEVtEZGcQtpgCGgbXxaUpULIy5nvrbRzXSNyT6iXhK1CLqiFVkfh-Y-DHXdB6Q4sg.uYdpxl835KnlkqC5.gBgSnPWZOo6FINovJNG7Xx2RuS09QJbU4-_J4EgZQkygt8xE-HfdYaOmtmJLjGJR1XKoaRsuX1gNjFoCZgqWAon6.Zsrk52dkjskSVQLXZBQooQ",
   "access_token": "eyJhbGciOiJSU0EtT0FFUCIsImVuYyI6IkEyNTZHQ00ifQ.n-gGe65x0SlSXS3fTG8ZLdXvv6b5_1pDvkcGyCjFy-vm1VhaBEQL5p3hc6iUcCAcuyrqzGk95lV9dHCv46cNfCiUFHWfbEcd4nqScIxBbc28xO9L1mNLnZ0G1rx1Mx1L0Y_ZPoSxDXpJaHCT28cdZffHLxx2B9ioIClgdlYBAJ5Oz8VT39-D0QSomS6QhFqmcpbDsXrsKxs545Pn-TIlu-fSQ4wpIvAxusOKB6CV2EYKqBplMBrh-3btE8WksVcX2N3LsrcMhrKxSKi93c06MZh6JzSLWe5bl9hvUvBdEuwDrk-fQgD3ZlmjjoevRWYhv_kslW1PlqUHYmKOQ7csUw.3mvvsFWikEjZzExA.YixjnnzzcPRy_uUpgPv5zqOfshv3pUwfrME0AijpsB7u9CmJe94g6f2y_3vqUps-5weKKGZyk3ZtnwEbPVAk9-HZt-Y27SbZl4JNCFEOLVsMsK8.h4j9BdFXuWKKez6xxRAwJA"
}
Refresh tokens never expire, and can be used to obtain a new access token by sending a POST request to the
/oauth/access_token endpoint:
POST /myApp/oauth/access_token HTTP/1.1
Host: server.example.com
Content-Type: application/x-www-form-urlencodedgrant_type=refresh_token&refresh_token=eyJhbGciOiJSU0EtT0FFUCIsImVuYyI6IkEyNTZHQ00ifQ....
As you can see, is a form request with 2 parameters:
grant_type: must be refres_token always.refresh_token: the refresh token provided earlier.
As refresh tokens never expire, they must be securely stored in your client application. See
section 10.4 of the OAuth 2.0 spec for more information.
7.2 Memcached
To use Memcached, simply define the following configuration properties to match your environments accordingly:
| Config key | Default value |
|---|
grails.plugin.springsecurity.rest.token.storage.useMemcached | false |
grails.plugin.springsecurity.rest.token.storage.memcached.hosts | localhost:11211 |
grails.plugin.springsecurity.rest.token.storage.memcached.username | '' |
grails.plugin.springsecurity.rest.token.storage.memcached.password | '' |
grails.plugin.springsecurity.rest.token.storage.memcached.expiration | 3600 |
For development, if you have Memcached installed locally with the default settings, just define
grails.plugin.springsecurity.rest.token.storage.useMemcached = true. It should work.
In Memcached tokens will expire automatically after the configured timeout (1h by default).
They get refreshed on every access
7.3 GORM
To use GORM, these are the relevant configuration properties:
| Config key | Default value |
|---|
grails.plugin.springsecurity.rest.token.storage.useGorm | false |
grails.plugin.springsecurity.rest.token.storage.gorm.tokenDomainClassName | null |
grails.plugin.springsecurity.rest.token.storage.gorm.tokenValuePropertyName | tokenValue |
grails.plugin.springsecurity.rest.token.storage.gorm.usernamePropertyName | username |
The relevant domain class should look something like this:
package org.example.productclass AuthenticationToken {    String tokenValue
    String username    static mapping = {
        version false
    }
}
For the tokenDomainClassName configuration you must enter a fully qualified class name. In the case of the example above:
grails.plugin.springsecurity.rest.token.storage.gorm.tokenDomainClassName = 'org.example.product.AuthenticationToken'
A few things to take into consideration when using GORM for token storage:
- Instead of storing the whole
UserDetails object, probably only the username is needed. This is because applications
using this strategy will probably have the standard User and Role domain classes. When the token is verified the username
is passed to the default
userDetailsService bean, which in the case of the default Spring Security Core GORM
implementation will fetch the information from the mentioned domain classes.
- GORM's optimistic locking feature is likely unnecessary and may cause performance issues.
- You'll have to handle token expiration by yourself via Quartz jobs or a similar mechanism. There are various ways you might
go about this.
GORM Token Expiration Examples:Adding a GORM autoTimestamp property like
lastUpdated or
dateCreated and sorting out stale or old tokens with Quartz jobs
are the most obvious routes. Each has its drawbacks though.
dateCreated is useful if you want tokens to expire a set time after they are issued. However, API users who didn't pay
attention to when their token was issued may find themselves needing a new token unexpectedly.
lastUpdated requires a change to the token domain instance in order to be triggered. Something as simple as an access
counter may work as a strategy to keepTokens fresh, but doing a write to a disk based database on each token access may
be something you would prefer to avoid for the sake of performance.
Date lastUpdated
    Integer accessCount = 0    def afterLoad() {
      accessCount++
   }
Simply using your own date or timestamp is also a valid option.
Date refreshed = new Date()    def afterLoad() {
        // if being accessed and it is more than a day since last marked as refreshed
        // and it hasn't been wiped out by Quartz job (it exists, duh)
        // then refresh it
        if (refreshed < new Date() -1) {
            refreshed = new Date()
            it.save()
        }
    }
Here is an example quartz job to go with the custom refresh timestamp above:
class RemoveStaleTokensJob {
    static triggers = {
        cron name: 'every4hours', cronExpression: '0 0 */4 * * *'
    }    void execute() {
        AuthenticationToken.executeUpdate('delete AuthenticationToken a where a.refreshed < ?' [new Date()-1])
    }
}
7.4 Redis
To use Redis as a token store simply you just have to enable it in you configuration by setting
useRedis to
true
(see table below).
You have to have the
redis plugin installed in order to be able to use Redis as your token store. Refer to the
Redis plugin documentation for more details about how to configure it.
Configuration options for Redis:
| Config key | Default value |
|---|
grails.plugin.springsecurity.rest.token.storage.useRedis | false |
grails.plugin.springsecurity.rest.token.storage.redis.expiration | 3600 |
7.5 Grails Cache
To use
Grails Cache, simply define a cache name:
| Config key | Default value |
|---|
grails.plugin.springsecurity.rest.token.storage.useGrailsCache | false |
grails.plugin.springsecurity.rest.token.storage.grailsCacheName | null |
The cache name should correspond to a name specified in the
cache DSL.
Token expiration / eviction / TTLBy default, Spring Cache abstraction
does not support expiration.
It depends on the specific support of the actual providers. Grails has several plugins for this:
There is a bug in :cache-ehcache:1.0.0 plugin that will cause issues. It's recommended that you use the latest version.
See #89 for more information.
8 Token Rendering
By default, this plugin renders the token in
RFC 6750 Bearer Token format:
HTTP/1.1 200 OK
Content-Type: application/json;charset=UTF-8
Cache-Control: no-store
Pragma: no-cache{
    "access_token":"eyJhbGciOiJIUzI1NiJ9.eyJleHAiOjE0MjI5OTU5MjIsInN1YiI6ImppbWkiLCJyb2xlcyI6WyJST0xFX0FETUlOIiwiUk9MRV9VU0VSIl0sImlhdCI6MTQyMjk5MjMyMn0.rA7A2Gwt14LaYMpxNRtrCdO24RGrfHtZXY9fIjV8x8o",
    "token_type":"Bearer",
    "username": "john.doe",
    "roles": [
        "ROLE_ADMIN",
        "ROLE_USER"
    ]
}
As per the RFC, access_token and token_type property names cannot be customised.
The JSON structure can be customised with the following configuration keys:
| Config key | Default value |
|---|
grails.plugin.springsecurity.rest.token.rendering.usernamePropertyName | username |
grails.plugin.springsecurity.rest.token.rendering.authoritiesPropertyName | roles |
Eg, with the following configuration:
grails.plugin.springsecurity.rest.token.rendering.usernamePropertyName = 'login'
grails.plugin.springsecurity.rest.token.rendering.authoritiesPropertyName = 'permissions'
The output will look like:
{
    "access_token":"eyJhbGciOiJIUzI1NiJ9.eyJleHAiOjE0MjI5OTU5MjIsInN1YiI6ImppbWkiLCJyb2xlcyI6WyJST0xFX0FETUlOIiwiUk9MRV9VU0VSIl0sImlhdCI6MTQyMjk5MjMyMn0.rA7A2Gwt14LaYMpxNRtrCdO24RGrfHtZXY9fIjV8x8o",
    "token_type":"Bearer",
    "login": "john.doe",
    "permissions": [
        "ROLE_ADMIN",
        "ROLE_USER"
    ]
}
Disabling bearer tokens support for full response customisation
In order to fully customise the response, you need first to disable bearer tokens support by setting
grails.plugin.springsecurity.rest.token.validation.useBearerToken = false. That will enable you to use this additional
property:
| Config key | Default value |
|---|
grails.plugin.springsecurity.rest.token.rendering.tokenPropertyName | access_token |
Disabling bearer token support impacts the way tokens are extracted from the HTTP request. Please, read carefully
the chapter about token validation first.
If you want your own implementation, simply create a class implementing
RestAuthenticationTokenJsonRenderer
and wire it up in
resources.groovy with name
restAuthenticationTokenJsonRenderer.
The principal object stored in the security context, and passed to the JSON renderer, is coming from the configured
authentication providers. In most cases, this will be a UserDetails object retrieved using the userDetailsService bean.
If you want to render additional information in your JSON response, you have to:
- Configure an alternative
userDetailsService bean that retrieves the additional information you want, and put it in a principal object.
- Configure an alternative
restAuthenticationTokenJsonRenderer that reads that information from the restAuthenticationToken.principal object.
9 Token Validation Filter
The token validation filter looks for the token in the request and then tries to validate it using the configured
token storage implementation.
If the validation is successful, the principal object is stored in the security context. This allows you to use in
your application
@Secured,
springSecurityService.principal and so on.
springSecurityService.currentUser expects a grails.plugin.springsecurity.userdetails.GrailsUser to perform a DB query.
However, this plugins stores in the security context just a principal Object, because it does not assume you are using
domain classes to store the users. Use springSecurityService.principal instead.
This plugin supports
RFC 6750 Bearer Token specification out-of-the-box.
Sending tokens in the request
The token can be sent in the
Authorization request reader:
GET /protectedResource HTTP/1.1
Host: server.example.com
Authorization: Bearer eyJhbGciOiJIUzI1NiJ9.eyJleHAiOjE0MjI5OTU5MjIsInN1YiI6ImppbWkiLCJyb2xlcyI6WyJST0xFX0FETUlOIiwiUk9MRV9VU0VSIl0sImlhdCI6MTQyMjk5MjMyMn0.rA7A2Gwt14LaYMpxNRtrCdO24RGrfHtZXY9fIjV8x8o
Or using form-encoded body parameters:
POST /protectedResource HTTP/1.1
Host: server.example.com
Content-Type: application/x-www-form-urlencodedaccess_token=eyJhbGciOiJIUzI1NiJ9.eyJleHAiOjE0MjI5OTU5MjIsInN1YiI6ImppbWkiLCJyb2xlcyI6WyJST0xFX0FETUlOIiwiUk9MRV9VU0VSIl0sImlhdCI6MTQyMjk5MjMyMn0.rA7A2Gwt14LaYMpxNRtrCdO24RGrfHtZXY9fIjV8x8o
Note that in this case,
GET HTTP method is not supported.
If you disable the bearer token support, you can customise it further:
grails.plugin.springsecurity.rest.token.validation.useBearerToken = false
grails.plugin.springsecurity.rest.token.validation.headerName = 'X-Auth-Token'
If you still want to have full access and read the token from a different part of the request, you can implement a
TokenReader
and register it in your
resources.groovy as
tokenReader.
Anonymous access
If you want to enable anonymous access to URL's where this plugin's filters are applied, you need to:
- Configure
enableAnonymousAccess = true (see table below).
- Make sure that the
anonymousAuthenticationFilter is applied before restTokenValidationFilter. See how to configure filters for more details.
For example, with this configuration:
grails {
    plugin {
        springsecurity {
            filterChain {
                chainMap = [
                    '/api/guest/**': 'anonymousAuthenticationFilter,restTokenValidationFilter,restExceptionTranslationFilter,filterInvocationInterceptor',
                    '/api/**': 'JOINED_FILTERS,-anonymousAuthenticationFilter,-exceptionTranslationFilter,-authenticationProcessingFilter,-securityContextPersistenceFilter',
                    '/**': 'JOINED_FILTERS,-restTokenValidationFilter,-restExceptionTranslationFilter'
                ]
            }            //Other Spring Security settings
            //...            rest {
                token {
                    validation {
                        enableAnonymousAccess = true
                    }
                }
            }
        }
    }
}
The following chains are configured:
/api/guest/** is a stateless chain that allows anonymous access when no token is sent. If however a token is on the request, it will be validated./api/** is a stateless chain that doesn't allow anonymous access. Thus, the token will always be required, and if missing, a Bad Request reponse will be sent back to the client./** (read: everything else) is a traditional stateful chain.
Validation Endpoint
There is also an endpoint available that you can call in case you want to know if a given token is valid. It looks for
the token in a HTTP header as well, and if the token is still valid, it renders
its JSON representation.
If the token does not exist, it will render a
grails.plugin.springsecurity.rest.login.failureStatusCode response
(
401 by default).
The relevant configuration properties for the validation endpoint are:
| Config key | Default value |
|---|
grails.plugin.springsecurity.rest.token.validation.active | true |
grails.plugin.springsecurity.rest.token.validation.headerName | X-Auth-Token |
grails.plugin.springsecurity.rest.token.validation.endpointUrl | /api/validate |
Note that
headerName is only considered if
grails.plugin.springsecurity.rest.token.validation.useBearerToken is set
to
false. Otherwise (the default approach), as per RFC 6750, the header name will be
Authorization and the value
will be
Bearer TOKEN_VALUE
10 CORS support
This plugin comes pre-installed with the
CORS plugin, which enables
Cross-Origin Resource Sharing. Refer to the
plugin documentation to learn how to configure it.
The CORS plugin activates itself by default. If you don't want it for some environments, you can use
cors.enabled = false within the appropriate environment block in your
Config.groovy.
If you don't want CORS support at all, you can skip the plugin by excluding it
when defining this plugin in your
BuildConfig.groovy:
compile ':spring-security-rest:1.5.0.RC3', {
    exclude 'cors
}
Note that you have to explicitly expose the headers you are using for token validation. Otherwise, the frontend application
won't be allowed to read them:
cors.headers = ['Access-Control-Allow-Headers': 'Content-Type, Authorization']
Be also aware of the default behaviour of the CORS plugin for
Access-Control-Allow-Origin is to just echo the
Origin
header sent by the browser. Make sure that in your production environment you properly configure the header.
11 Delegating authentication to OAuth providers
This plugin is meant to be used in applications serving a REST API's to pure Javascript clients. The main authentication
flow of this plugin is to allow you to authenticate your users against any Spring Security-compatible user directory
(like a DB or an LDAP server).
However, there might be situations where you want to delegate the authentication against a third-party provider, like
Google or Facebook. Unfortunately, your pure Javascript front-end application cannot request the providers directly using
OAuth, because then the access keys will be made public.
So is this plugin's responsibility to provide endpoints so your Grails backend acts as a proxy for your front-end client.
The flow is something like the following:
- The client application requests and endpoint that requires authentication, so the server responds with a 401 response (*).
- The client redirects the user to the login form (*).
- This time, instead of using username and password, the user clicks on "Login with Google" button.
- Browser navigates to a Grails URL. Grails will generate a Google Login URL, giving Google a Grails callback URL.
- Browser navigates to Google Login. User logs in, and Google redirects the browser to the Grails callback URL.
- Browser navigates to that Grails callback URL. Then, Grails will use OAuth to fetch user information (like email) from Google. Based on that, will generate a REST API token and fetch and store principal information. The response from Grails will be a front-end URL where the token is a parameter.
- The browser will navigate to that URL, and the Javascript logic will read the token from the URL and store it locally.
- The client sends again a request to the protected resource, passing the token as an HTTP header (*).
The steps flagged with (*) remain unchanged from the
normal flow.
To support OAuth, this plugin uses
Profile & Authentication Client for Java. So you
can use any OAuth 2.0 provider they support. This includes at the time of writing:
- Dropbox.
- Facebook.
- GitHub.
- Google.
- LinkedIn.
- Windows Live.
- Wordpress.
- Yahoo.
- Paypal.
Note that OAuth 1.0a providers also work, like Twitter.
To start the OAuth authentication flow, from your frontend application, generate a link to
<YOUR_GRAILS_APP>/oauth/authenticate/<provider>. The user clicking on that link represents step 4 in the previous
diagram.
Note that you can define the frontend callback URL in
Config.groovy under
grails.plugin.springsecurity.rest.oauth.frontendCallbackUrl. You need to define a closure that will be called with
the token value as parameter:
grails.plugin.springsecurity.rest.oauth.frontendCallbackUrl = { String tokenValue -> "http://my.frontend-app.com/welcome#token=${tokenValue}" }You can also define the URL as a
callback parameter in the original link, eg:
http://your-grails-api.com/oauth/authenticate/google?callback=http://your-frontend-app.com/auth-success.html?token=
In this case, the token will be
concatenated to the end of the URL.
Upon successful OAuth authorisation (after step 6.1 in the above diagram), an
OauthUser
will be stored in the security context. This is done by a bean named
oauthUserDetailsService. The
default implementation
delegates to the configured
userDetailsService bean, passing the profile ID as the username:
/**
 * Builds an {link OauthUser}. Delegates to the default {link UserDetailsService#loadUserByUsername(java.lang.String)}
 * where the username passed is {@link UserProfile#getId()}. If the user is not found, it will create a new one with
 * the the default roles.
 */
@Slf4j
class DefaultOauthUserDetailsService implements OauthUserDetailsService {    @Delegate
    UserDetailsService userDetailsService    OauthUser loadUserByUserProfile(OAuth20Profile userProfile, Collection<GrantedAuthority> defaultRoles)
            throws UsernameNotFoundException {
        UserDetails userDetails
        OauthUser oauthUser        try {
            log.debug "Trying to fetch user details for user profile: ${userProfile}"
            userDetails = userDetailsService.loadUserByUsername userProfile.id
            Collection<GrantedAuthority> allRoles = userDetails.authorities + defaultRoles
            oauthUser = new OauthUser(userDetails.username, userDetails.password, allRoles, userProfile)
        } catch (UsernameNotFoundException unfe) {
            log.debug "User not found. Creating a new one with default roles: ${defaultRoles}"
            oauthUser = new OauthUser(userProfile.id, 'N/A', defaultRoles, userProfile)
        }
        return oauthUser
    }}
If you want to provide your own implementation, define it in
resources.groovy with bean name
oauthUserDetailsService.
Make sure you implements the interface
OauthUserDetailsServiceIf you want to do any additional post-OAuth authorisation check, you should do it on your
loadUserByUserProfile
implementation. This is useful if you want to allow your corporate users to log into your application using their Gmail
account. In this case, you should decide based on OAuth20Profile.getEmail(), for instance:
OauthUser loadUserByUserProfile(OAuth20Profile userProfile, Collection<GrantedAuthority> defaultRoles) throws UsernameNotFoundException {
    if (userProfile.email.endsWith('example.org')) {
        return new OauthUser(userProfile.id, 'N/A', defaultRoles, userProfile)
    } else {
        throw new UsernameNotFoundException("User with email ${userProfile.email} now allowed. Only @example.org accounts are allowed.")
    }
}
In case of any OAuth authentication failure, the plugin will redirect back to the frontend application anyway, so it
has a chance to render a proper error message and/or offer the user the option to try again. In that case, the token
parameter will be empty, and both
error and
message params will be appended:
http://your-frontend-app.com/auth-success.html?token=&error=403&message=User+with+email+jimmy%40gmail.com+now+allowed.+Only+%40example.com+accounts+are+allowed
Below are some examples on how to configure it for Google, Facebook and Twitter.
11.1 Google
Define the following block in your
Config.groovy:
grails {
    plugin {
        springsecurity {            rest {                oauth {                    frontendCallbackUrl = { String tokenValue -> "http://my.frontend-app.com/welcome#token=${tokenValue}" }                    google {                        client = org.pac4j.oauth.client.Google2Client
                        key = 'xxxx.apps.googleusercontent.com'
                        secret = 'xxx'
                        scope = org.pac4j.oauth.client.Google2Client.Google2Scope.EMAIL_AND_PROFILE
                        defaultRoles = ['ROLE_USER', 'ROLE_GOOGLE']                    }
                }
            }
        }
    }
}
The scope can be from any value of the enum org.pac4j.oauth.client.Google2Client.Google2Scope. But if you use the
default OauthUserDetailsService, you need to use EMAIL_AND_PROFILE. That is because the default implementation
uses the profile ID as the username, and that is only returned by Google if EMAIL_AND_PROFILE scope is used.
11.2 Facebook
Define the following block in your
Config.groovy:
grails {
    plugin {
        springsecurity {            rest {                oauth {                    frontendCallbackUrl = { String tokenValue -> "http://my.frontend-app.com/welcome#token=${tokenValue}" }                    facebook {                        client = org.pac4j.oauth.client.FacebookClient
                        key = 'xxx'
                        secret = 'yyy'
                        scope = 'email,user_location'
                        fields = 'id,name,first_name,middle_name,last_name,username'
                        defaultRoles = ['ROLE_USER', 'ROLE_FACEBOOK']
                    }
                }
            }
        }
    }
}
The
scope is a comma-separated list,
without blanks, of Facebook permissions. See the
Facebook documentation for more details.
fields may contain a comma-separated list,
without blanks, of
user fields.
Both
scope and
fields are optional, but it's highly recommendable to fine tune those lists so you don't ask for
information you don't need.
Define the following block in your
Config.groovy:
grails {
    plugin {
        springsecurity {            rest {                oauth {                    frontendCallbackUrl = { String tokenValue -> "http://my.frontend-app.com/welcome#token=${tokenValue}" }                    twitter {                        client = org.pac4j.oauth.client.TwitterClient
                        key = 'xxx'
                        secret = 'yyy'
                        defaultRoles = ['ROLE_USER', 'ROLE_TWITTER']
                    }
                }
            }
        }
    }
}
There is no additional configuration for Twitter.
12 Debugging
If you need debug information, you can specify the following entries in
Config.groovy:
log4j = {
    ...    debug  'grails.plugin.springsecurity',
           'grails.app.controllers.grails.plugin.springsecurity',
           'grails.app.services.grails.plugin.springsecurity',
           'org.pac4j',
           'org.springframework.security'    …
}
13 Frequently Asked Questions
Why this token-based implementation? Can't I use HTTP basic authentication?
In theory you can. The only restriction to be truly stateless is to not use HTTP sessions at all. So if you go with
basic authentication, you need to transfer the credentials back and forth every time.
Let's think about that. Keep in mind that your frontend is a pure HTML/Javascript application, consuming a REST API
from the Grails side. So the first time, the Javascript application will make an API query and will receive a 401 response
indicating that authentication is required. Then you present the user a form to enter credentials, you grab them,
encode
them with Base64 and in the next request, you send an HTTP header like
Authorization: Basic QWxhZGRpbjpvcGVuIHNlc2FtZQ==.
Now remember you are doing RESTful application, so the session state is maintained in the client. That means that you
would need to store that Base64 encoded string somewhere: cookies? HTML5 local storage? In any case, they are accessible
using browser tools. And that's the point: there is a huge security risk because Base64 it's not encryption, just encoding.
And it can be easily decoded.
You could argue that someone can access the token in the browser. Yes, but having the token will not allow him to obtain
user's credentials. The tokens are just not decodable. And they can be revoked if necessary.
Fortunately for you, a token-based solution is not a magic idea that I only got; it's actually a specification:
RFC 6750 - The OAuth 2.0 Authorization Framework: Bearer Token Usage.
Moreover, if you use tokens, you have the chance to implement expiration policies.
A couple of link with further explanations on the token-based flow:
Why can't the API be secured with OAuth?
RFC 6749 - OAuth 2.0 specification does cover this scenario in what they call
"public clients":
Clients incapable of maintaining the confidentiality of their credentials (e.g., clients executing on the device used by the
resource owner, such as an installed native application or a web browser-based application), and incapable of secure client
authentication via any other means.
The OAuth 2.0 specification supports public clients with the implicit grant. This plugin supports that by default when
you
delegate the authentication to another OAuth provider. If it's you who are authenticating the users
(via DB, LDAP, etc), the token-based flow of this plugin is
OAuth-ish .
Why you didn't use any of the existing OAuth plugins? Why pac4j?
I'm aware of plugins like
OAuth and
Spring Security OAuth, but all of them rely on Spring Security Core's
way of using HTTP sessions. So not acceptable.
I chose pac4j because:
- They support major OAuth 2.0 providers out-of-the-box, whereas Scribe does not.
- It's deadly simple and works just fine.
I'm also aware of a pac4j-spring-security module. See my previous response on HTTP sessions.
Dude, this is awesome. How can I compensate you?
I doubt you can :). You may try giving me free beers the next time you see me in a conference. Or you can just express
your gratitude via
Twitter.