10 Delegating authentication to OAuth providers - Reference Documentation
Authors: Alvaro Sanchez-Mariscal
Version: 1.4.0
10 Delegating authentication to OAuth providers
This plugin is meant to be used in applications serving a REST API's to pure Javascript clients. The main authentication flow of this plugin is to allow you to authenticate your users against any Spring Security-compatible user directory (like a DB or an LDAP server).However, there might be situations where you want to delegate the authentication against a third-party provider, like Google or Facebook. Unfortunately, your pure Javascript front-end application cannot request the providers directly using OAuth, because then the access keys will be made public.So is this plugin's responsibility to provide endpoints so your Grails backend acts as a proxy for your front-end client.The flow is something like the following: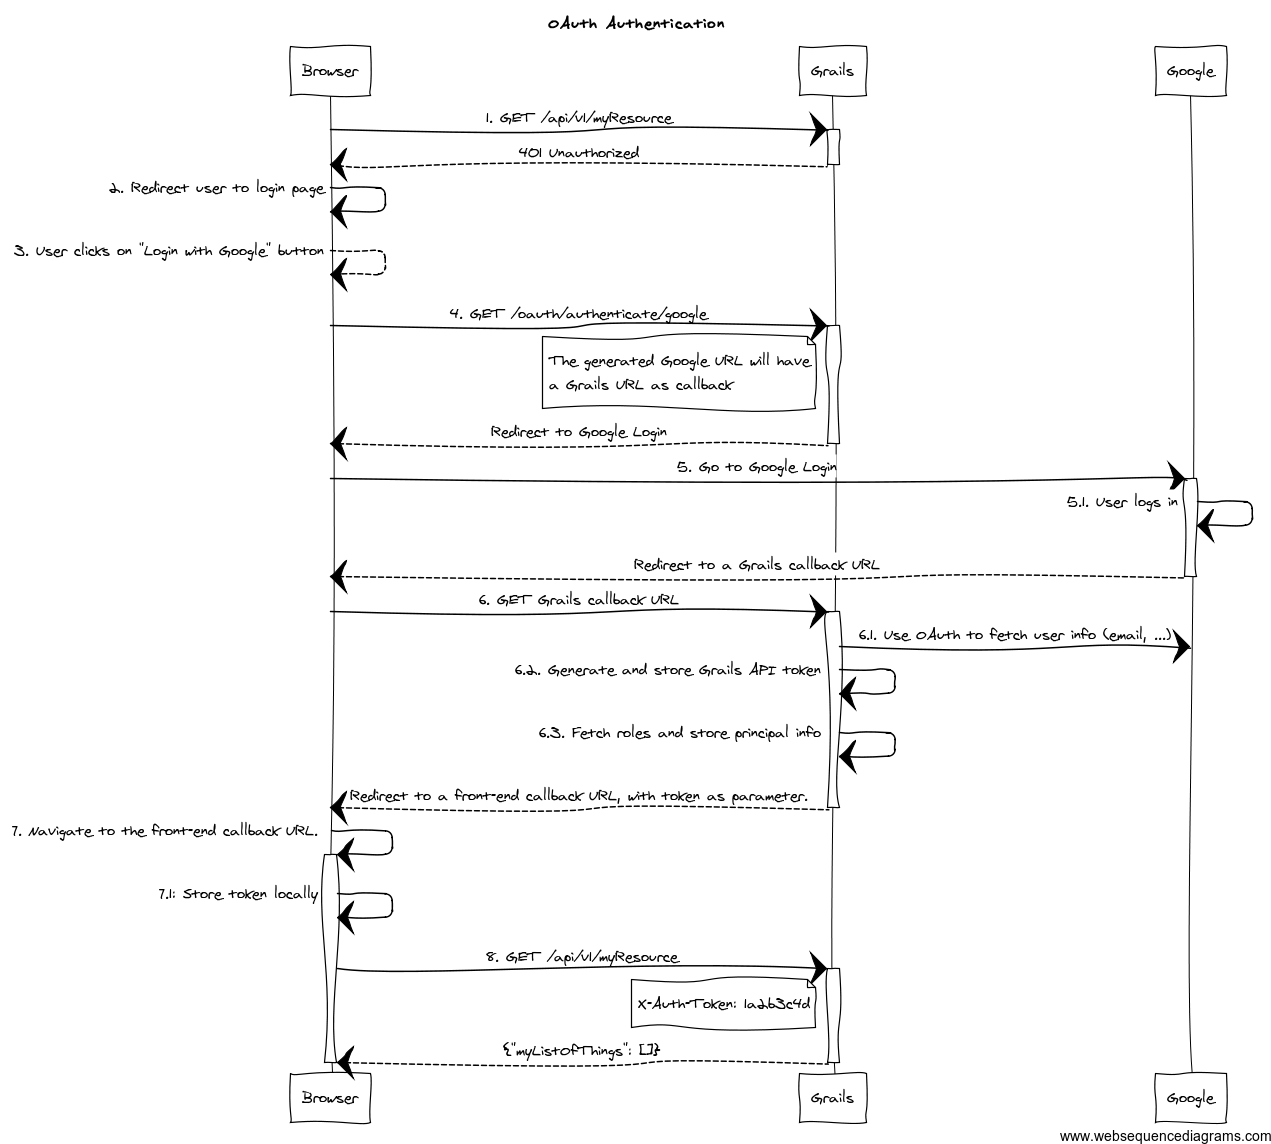
- The client application requests and endpoint that requires authentication, so the server responds with a 401 response (*).
- The client redirects the user to the login form (*).
- This time, instead of using username and password, the user clicks on "Login with Google" button.
- Browser navigates to a Grails URL. Grails will generate a Google Login URL, giving Google a Grails callback URL.
- Browser navigates to Google Login. User logs in, and Google redirects the browser to the Grails callback URL.
- Browser navigates to that Grails callback URL. Then, Grails will use OAuth to fetch user information (like email) from Google. Based on that, will generate a REST API token and fetch and store principal information. The response from Grails will be a front-end URL where the token is a parameter.
- The browser will navigate to that URL, and the Javascript logic will read the token from the URL and store it locally.
- The client sends again a request to the protected resource, passing the token as an HTTP header (*).
- Dropbox.
- Facebook.
- GitHub.
- Google.
- LinkedIn.
- Twitter.
- Windows Live.
- Wordpress.
- Yahoo.
- Paypal.
Remember: only OAuth 2.0 providers are supported by this plugin at the moment.To start the OAuth authentication flow, from your frontend application, generate a link to
<YOUR_GRAILS_APP>/oauth/authenticate/<provider>. The user clicking on that link represents step 4 in the previous
diagram.Note that you can define the frontend callback URL in Config.groovy under
grails.plugin.springsecurity.rest.oauth.frontendCallbackUrl. You need to define a closure that will be called with
the token value as parameter:grails.plugin.springsecurity.rest.oauth.frontendCallbackUrl = { String tokenValue -> "http://my.frontend-app.com/welcome#token=${tokenValue}" }
callback parameter in the original link, eg:http://your-grails-api.com/oauth/authenticate/google?callback=http://your-frontend-app.com/auth-success.html?token=
oauthUserDetailsService. The
default implementation
delegates to the configured userDetailsService bean, passing the profile ID as the username:/**
* Builds an {link OauthUser}. Delegates to the default {link UserDetailsService#loadUserByUsername(java.lang.String)}
* where the username passed is {@link UserProfile#getId()}. If the user is not found, it will create a new one with
* the the default roles.
*/
@Slf4j
class DefaultOauthUserDetailsService implements OauthUserDetailsService { @Delegate
UserDetailsService userDetailsService OauthUser loadUserByUserProfile(OAuth20Profile userProfile, Collection<GrantedAuthority> defaultRoles)
throws UsernameNotFoundException {
UserDetails userDetails
OauthUser oauthUser try {
log.debug "Trying to fetch user details for user profile: ${userProfile}"
userDetails = userDetailsService.loadUserByUsername userProfile.id
Collection<GrantedAuthority> allRoles = userDetails.authorities + defaultRoles
oauthUser = new OauthUser(userDetails.username, userDetails.password, allRoles, userProfile)
} catch (UsernameNotFoundException unfe) {
log.debug "User not found. Creating a new one with default roles: ${defaultRoles}"
oauthUser = new OauthUser(userProfile.id, 'N/A', defaultRoles, userProfile)
}
return oauthUser
}}resources.groovy with bean name oauthUserDetailsService.
Make sure you implements the interface OauthUserDetailsServiceIf you want to do any additional post-OAuth authorisation check, you should do it on your loadUserByUserProfile
implementation. This is useful if you want to allow your corporate users to log into your application using their Gmail
account. In this case, you should decide based on OAuth20Profile.getEmail(), for instance:OauthUser loadUserByUserProfile(OAuth20Profile userProfile, Collection<GrantedAuthority> defaultRoles) throws UsernameNotFoundException { if (userProfile.email.endsWith('example.org')) { return new OauthUser(userProfile.id, 'N/A', defaultRoles, userProfile) } else { throw new UsernameNotFoundException("User with email ${userProfile.email} now allowed. Only @example.org accounts are allowed.") } }
error and message params will be appended:http://your-frontend-app.com/auth-success.html?token=&error=403&message=User+with+email+jimmy%40gmail.com+now+allowed.+Only+%40example.com+accounts+are+allowed
10.1 Google
Define the following block in yourConfig.groovy:grails {
plugin {
springsecurity { rest { oauth { frontendCallbackUrl = { String tokenValue -> "http://my.frontend-app.com/welcome#token=${tokenValue}" } google { client = org.pac4j.oauth.client.Google2Client
key = 'xxxx.apps.googleusercontent.com'
secret = 'xxx'
scope = org.pac4j.oauth.client.Google2Client.Google2Scope.EMAIL_AND_PROFILE
defaultRoles = ['ROLE_USER', 'ROLE_GOOGLE'] }
}
}
}
}
}Thescopecan be from any value of the enumorg.pac4j.oauth.client.Google2Client.Google2Scope. But if you use the defaultOauthUserDetailsService, you need to useEMAIL_AND_PROFILE. That is because the default implementation uses the profile ID as the username, and that is only returned by Google ifEMAIL_AND_PROFILEscope is used.
10.2 Facebook
Define the following block in yourConfig.groovy:grails {
plugin {
springsecurity { rest { oauth { frontendCallbackUrl = { String tokenValue -> "http://my.frontend-app.com/welcome#token=${tokenValue}" } facebook { client = org.pac4j.oauth.client.FacebookClient
key = 'xxx'
secret = 'yyy'
scope = 'email,user_location'
fields = 'id,name,first_name,middle_name,last_name,username'
defaultRoles = ['ROLE_USER', 'ROLE_FACEBOOK']
}
}
}
}
}
}scope is a comma-separated list, without blanks, of Facebook permissions. See the
Facebook documentation for more details.fields may contain a comma-separated list, without blanks, of
user fields.Both scope and fields are optional, but it's highly recommendable to fine tune those lists so you don't ask for
information you don't need.
10.3 Twitter
Define the following block in yourConfig.groovy:grails {
plugin {
springsecurity { rest { oauth { frontendCallbackUrl = { String tokenValue -> "http://my.frontend-app.com/welcome#token=${tokenValue}" } twitter { client = org.pac4j.oauth.client.TwitterClient
key = 'xxx'
secret = 'yyy'
defaultRoles = ['ROLE_USER', 'ROLE_TWITTER']
}
}
}
}
}
}