(Quick Reference)
7 Token Storage - Reference Documentation
Authors: Alvaro Sanchez-Mariscal
Version: 1.5.0.RC3
7 Token Storage
The tokens are stored on the server using a
tokenStorageService bean. The plugin comes with out-of-the-box support
for JWT, Memcached, GORM and
Grails Cache, but you can use your own strategy implementing the
TokenStorageService
interface.
The default implementation, JWT, is stateless. Nothing is really stored. However, the plugin still gives a
chance to the other implementations to store the principal if they need to.
7.1 JSON Web Token
JSON Web Token (JWT) is an
IETF standard (in progress)
which defines a secure way to encapsulate arbitrary data that can be sent over unsecure URL's.
Generally speaking, JWT's can be useful in the following use cases:
- When generating "one click" action emails, like "delete this comment" or "add this to favorites". Instead of giving the users URL's like
/comment/delete/123, you can give them something like /comment/delete/<JWT_TOKEN>, where the JWT_TOKEN contains encapsulated information about the user and the comment, in a safe way, so authentication is not required.
- To achieve single sign-on, by sharing a JWT across applications.
In the context of authentication and authorization, JWT will help you implement a stateless implementation, as the
principal information is stored directly in the JWT.
How does a JWT looks like?
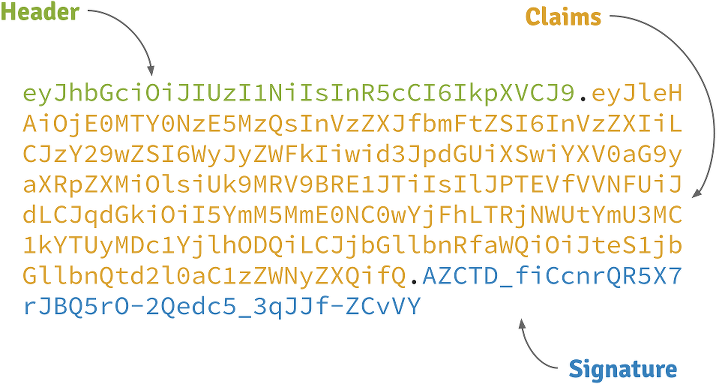
Header
A base64-encoded JSON like:
{
    "alg": "HS256",
    "typ": "JWT"
}
Claims
A base64-encoded JSON like:
{
    "exp": 1422990129,
    "sub": "jimi",
    "roles": [
        "ROLE_ADMIN",
        "ROLE_USER"
    ],
    "iat": 1422986529
}
Signature
Depends on the algorithm specified on the header, it can be a digital signature of the base64-encoded header and claims,
or an encryption of them using RSA.
Signed JWT's
By default, this plugin uses signed JWT's as specified by the
JSON Web Signature specification. More specifically,
the algorithm used is HMAC SHA-256 with a specified shared secret. The relevant configuration properties are:
| Config key | Default value |
|---|
grails.plugin.springsecurity.rest.token.storage.useJwt | true |
grails.plugin.springsecurity.rest.token.storage.jwt.useSignedJwt | true |
grails.plugin.springsecurity.rest.token.storage.jwt.secret | 'qrD6h8K6S9503Q06Y6Rfk21TErImPYqa' |
grails.plugin.springsecurity.rest.token.storage.jwt.expiration | 3600 |
Encrypted JWT's
Grails's grails-docs artifact includes a version of com.lowagie:itext which in turns bring old BouncyCastle's libraries
into the classpath. To avoid the problem, you have to override explicitly that dependency:build("com.lowagie:itext:2.0.8") { excludes "bouncycastle:bcprov-jdk14:138", "org.bouncycastle:bcprov-jdk14:1.38" }
In the previous strategy, the claims are just signed, so it prevents an attacker to tamper its contents to introduce
malicious data or try a privilege escalation by adding more roles. However, the claims can be decoded just by using
Base 64.
If the claims contains sensitive information, you can use a
JSON Web Encryption algorithm to prevent them to be decoded.
Particularly, this plugin uses RSAES OAEP for key encryption and AES GCM (Galois/Counter Mode) algorithm with a 256 bit key
for content encryption.
By default, RSA public/private keys ar generated every time the application runs. This means that generated tokens
won't be decrypted across executions of the application. So better create your own key pair using OpenSSL:
openssl genrsa -out private_key.pem 2048
openssl pkcs8 -topk8 -inform PEM -outform DER -in private_key.pem -out private_key.der -nocrypt
openssl rsa -in private_key.pem -pubout -outform DER -out public_key.der
Then, configure the keys properly, along with the rest of the configuration:
| Config key | Default value |
|---|
grails.plugin.springsecurity.rest.token.storage.useJwt | true |
grails.plugin.springsecurity.rest.token.storage.jwt.useEncryptedJwt | false |
grails.plugin.springsecurity.rest.token.storage.jwt.privateKeyPath | null |
grails.plugin.springsecurity.rest.token.storage.jwt.publicKeyPath | null |
Example configuration:
grails.plugin.springsecurity.rest.token.storage.jwt.useEncryptedJwt = true
grails.plugin.springsecurity.rest.token.storage.jwt.privateKeyPath = '/path/to/private_key.der'
grails.plugin.springsecurity.rest.token.storage.jwt.publicKeyPath = '/path/to/public_key.der'
Token expiration and refresh tokens
When using JWT, issued access tokens expire after a period of time, and they are paired with refresh tokens, eg:
{
   "username": "jimi",
   "roles": [
      "ROLE_ADMIN",
      "ROLE_USER"
   ],
   "expires_in": 3600,
   "token_type": "Bearer",
   "refresh_token": "eyJhbGciOiJSU0EtT0FFUCIsImVuYyI6IkEyNTZHQ00ifQ.fUaSWIdZakFX7CyimRIPhuw0sfevgmwL2xzm5H0TuaqwKx24EafCO0TruGKG-lN-wGCITssnF2LQTqRzQGp0PoLXHfUJ0kkz5rBl6LtnRu7cdD1ZUNYXLJtFjQ3IATzoo15tPafRPyStG1Qm7-1L0VxquhrLxkkpti0F1_VTytZAq8ltFrnxM4ahJUwS7eriivvdLqmHtnwuXw0kBXEseIyCkiyKklWDJAcD_P_gHoQJvSCoXedlr7Pp0n6LEUrRWJ2Hb-Zyt9dWqWDxm9nyDeEVtEZGcQtpgCGgbXxaUpULIy5nvrbRzXSNyT6iXhK1CLqiFVkfh-Y-DHXdB6Q4sg.uYdpxl835KnlkqC5.gBgSnPWZOo6FINovJNG7Xx2RuS09QJbU4-_J4EgZQkygt8xE-HfdYaOmtmJLjGJR1XKoaRsuX1gNjFoCZgqWAon6.Zsrk52dkjskSVQLXZBQooQ",
   "access_token": "eyJhbGciOiJSU0EtT0FFUCIsImVuYyI6IkEyNTZHQ00ifQ.n-gGe65x0SlSXS3fTG8ZLdXvv6b5_1pDvkcGyCjFy-vm1VhaBEQL5p3hc6iUcCAcuyrqzGk95lV9dHCv46cNfCiUFHWfbEcd4nqScIxBbc28xO9L1mNLnZ0G1rx1Mx1L0Y_ZPoSxDXpJaHCT28cdZffHLxx2B9ioIClgdlYBAJ5Oz8VT39-D0QSomS6QhFqmcpbDsXrsKxs545Pn-TIlu-fSQ4wpIvAxusOKB6CV2EYKqBplMBrh-3btE8WksVcX2N3LsrcMhrKxSKi93c06MZh6JzSLWe5bl9hvUvBdEuwDrk-fQgD3ZlmjjoevRWYhv_kslW1PlqUHYmKOQ7csUw.3mvvsFWikEjZzExA.YixjnnzzcPRy_uUpgPv5zqOfshv3pUwfrME0AijpsB7u9CmJe94g6f2y_3vqUps-5weKKGZyk3ZtnwEbPVAk9-HZt-Y27SbZl4JNCFEOLVsMsK8.h4j9BdFXuWKKez6xxRAwJA"
}
Refresh tokens never expire, and can be used to obtain a new access token by sending a POST request to the
/oauth/access_token endpoint:
POST /myApp/oauth/access_token HTTP/1.1
Host: server.example.com
Content-Type: application/x-www-form-urlencodedgrant_type=refresh_token&refresh_token=eyJhbGciOiJSU0EtT0FFUCIsImVuYyI6IkEyNTZHQ00ifQ....
As you can see, is a form request with 2 parameters:
grant_type: must be refres_token always.refresh_token: the refresh token provided earlier.
As refresh tokens never expire, they must be securely stored in your client application. See
section 10.4 of the OAuth 2.0 spec for more information.
7.2 Memcached
To use Memcached, simply define the following configuration properties to match your environments accordingly:
| Config key | Default value |
|---|
grails.plugin.springsecurity.rest.token.storage.useMemcached | false |
grails.plugin.springsecurity.rest.token.storage.memcached.hosts | localhost:11211 |
grails.plugin.springsecurity.rest.token.storage.memcached.username | '' |
grails.plugin.springsecurity.rest.token.storage.memcached.password | '' |
grails.plugin.springsecurity.rest.token.storage.memcached.expiration | 3600 |
For development, if you have Memcached installed locally with the default settings, just define
grails.plugin.springsecurity.rest.token.storage.useMemcached = true. It should work.
In Memcached tokens will expire automatically after the configured timeout (1h by default).
They get refreshed on every access
7.3 GORM
To use GORM, these are the relevant configuration properties:
| Config key | Default value |
|---|
grails.plugin.springsecurity.rest.token.storage.useGorm | false |
grails.plugin.springsecurity.rest.token.storage.gorm.tokenDomainClassName | null |
grails.plugin.springsecurity.rest.token.storage.gorm.tokenValuePropertyName | tokenValue |
grails.plugin.springsecurity.rest.token.storage.gorm.usernamePropertyName | username |
The relevant domain class should look something like this:
package org.example.productclass AuthenticationToken {    String tokenValue
    String username    static mapping = {
        version false
    }
}
For the tokenDomainClassName configuration you must enter a fully qualified class name. In the case of the example above:
grails.plugin.springsecurity.rest.token.storage.gorm.tokenDomainClassName = 'org.example.product.AuthenticationToken'
A few things to take into consideration when using GORM for token storage:
- Instead of storing the whole
UserDetails object, probably only the username is needed. This is because applications
using this strategy will probably have the standard User and Role domain classes. When the token is verified the username
is passed to the default
userDetailsService bean, which in the case of the default Spring Security Core GORM
implementation will fetch the information from the mentioned domain classes.
- GORM's optimistic locking feature is likely unnecessary and may cause performance issues.
- You'll have to handle token expiration by yourself via Quartz jobs or a similar mechanism. There are various ways you might
go about this.
GORM Token Expiration Examples:Adding a GORM autoTimestamp property like
lastUpdated or
dateCreated and sorting out stale or old tokens with Quartz jobs
are the most obvious routes. Each has its drawbacks though.
dateCreated is useful if you want tokens to expire a set time after they are issued. However, API users who didn't pay
attention to when their token was issued may find themselves needing a new token unexpectedly.
lastUpdated requires a change to the token domain instance in order to be triggered. Something as simple as an access
counter may work as a strategy to keepTokens fresh, but doing a write to a disk based database on each token access may
be something you would prefer to avoid for the sake of performance.
Date lastUpdated
    Integer accessCount = 0    def afterLoad() {
      accessCount++
   }
Simply using your own date or timestamp is also a valid option.
Date refreshed = new Date()    def afterLoad() {
        // if being accessed and it is more than a day since last marked as refreshed
        // and it hasn't been wiped out by Quartz job (it exists, duh)
        // then refresh it
        if (refreshed < new Date() -1) {
            refreshed = new Date()
            it.save()
        }
    }
Here is an example quartz job to go with the custom refresh timestamp above:
class RemoveStaleTokensJob {
    static triggers = {
        cron name: 'every4hours', cronExpression: '0 0 */4 * * *'
    }    void execute() {
        AuthenticationToken.executeUpdate('delete AuthenticationToken a where a.refreshed < ?' [new Date()-1])
    }
}
7.4 Redis
To use Redis as a token store simply you just have to enable it in you configuration by setting
useRedis to
true
(see table below).
You have to have the
redis plugin installed in order to be able to use Redis as your token store. Refer to the
Redis plugin documentation for more details about how to configure it.
Configuration options for Redis:
| Config key | Default value |
|---|
grails.plugin.springsecurity.rest.token.storage.useRedis | false |
grails.plugin.springsecurity.rest.token.storage.redis.expiration | 3600 |
7.5 Grails Cache
To use
Grails Cache, simply define a cache name:
| Config key | Default value |
|---|
grails.plugin.springsecurity.rest.token.storage.useGrailsCache | false |
grails.plugin.springsecurity.rest.token.storage.grailsCacheName | null |
The cache name should correspond to a name specified in the
cache DSL.
Token expiration / eviction / TTLBy default, Spring Cache abstraction
does not support expiration.
It depends on the specific support of the actual providers. Grails has several plugins for this:
There is a bug in :cache-ehcache:1.0.0 plugin that will cause issues. It's recommended that you use the latest version.
See #89 for more information.